Backup files from Windows PC to Synology server via rsync
XL / 2022-09-13
rsync is a Linux application that provides fast incremental file transfer between local and remote computers. “Incremental” means that it compares the source and destination so that rsync only transfers the modified pieces of files.
rsync has been included in Synology DiskStation Manager (DSM) as well as many Linux distributions. If not, rsync can be easily installed by apt install rsync (debian) or yum install rsync (fedora). rsync works in two modes: rsync module mode and ssh mode. In rsync module mode, you set up a configuration file /etc/rsyncd.conf on the server and keep the rsync run in the background. On the client machine, run rsync -[OPTIONS] source destination and push the ‘source’ directory (or files) to the ‘destination’. If the ‘source’ is a remote directory, rsync will pull all files back to your local ‘destination’. The most useful options are -a, -r, --delete. ‘a’ stands for archive and the metadata (e.g. time revised and permissions) will be transferred along with the files; ‘r’ stands for ‘recursive’ and all the files in sub-directories will be transferred, and ‘–delete’ will delete all the files that are no longer in the source directory from the destination, i.e. mirroring. A good rsync tutorial is available at Everything Linux.
In Synology DSM, a graphical user interface is available for the rsync service. On the client Windows PC, we can use DeltaCopy which wraps rsync, Cygwin and provides a windows-style user interface.
Enable rsync service on Synology
In Synology DSM, go to “Control Panel” and select “File services”. Move on to the “rsync” tab, and make sure the “Enable rsync service” as well as “Enable rsync account” boxes are checked.
If you would like to protect the rsync module with a password, open the “Edit rsync Account” window and add a user along with a password in it. Then click the “Apply” button at the bottom right corner of the “Control Panel” window.
That's all for the settings on the Synology side. Your Synology will create a folder named “NetBackup”.
There is documentation on how to enable the rsync service at Synology Knowledge Center.
DeltaCopy
Typically, you need to install and configure Cygwin on your Windows PC, as rsync is a Linux application. But with DeltaCopy, you don't need to configure Cygwin yourself. DeltaCopy is open source, provides Windows friendly interface for both rsync server and client settings and works with Windows task scheduler. The only drawback of DeltaCopy is that the latest version is over ten years old.
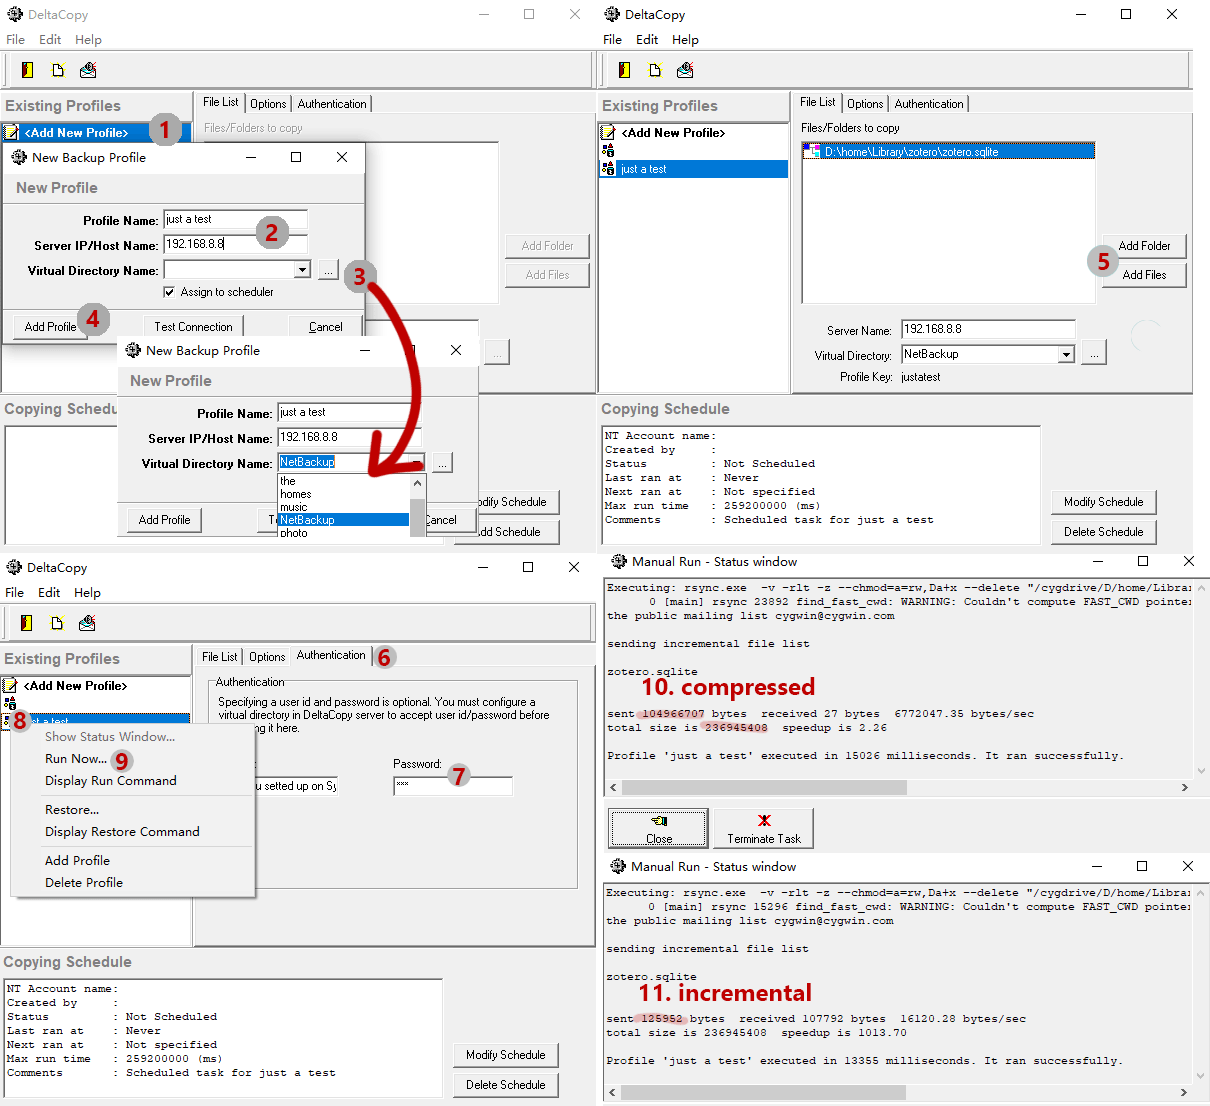
DeltaCopy is freely available at aboutmyip.com. Shortcuts for both DeltaCopy server and client appeared in your start menu after installation. Here, we only need the DeltaCopy client console, as we would like to transfer files from Windows PC to the Synology disk server.
Run “DeltaCopy Client” on the Windows PC. Double click “Add New Profile”, and then a new window will pop up. Add a profile name and type in the IP address of your Synology disk server. Then you can click the “Test Connection” button to check if the DeltaCopy client could connect to your Synology disk station. If successful, click the “…” button to load the directory names on your disk server and select a directory as the destination. Then click “Add Profile”.
A new profile appeared in the “Existing Profiles” panel. Select the profile and add some folders or files by clicking the “Add Folder” or “Add Files” buttons. Here, I add the database file of my Zotero library as an example. Then, move on to the “Authentication” tab, and type your user name along with its password into the dialogue box. This authentication setting should be consistent with your setting in Synology DSM.
Now, you are ready to have a test run. Right-click on your profile name, and click “Run Now”. A status window will pop up, which shows the file “zotero.sqlite” is copied to the server. The file is compressed during transfer, as approximately 105 MB is sent for a 237 MB file. If failed, you probably need manually create folders in your destination directory on your disk server to receive your files. For example, here I created a “zotero” folder in the “NetBackup”. Then, I revised my Zotero library by adding a tag to one of my references and running the profile again. Only 125 KB were sent which indicates only the modified parts were transferred.
Click the “Modify Schedule” button to configure the backup profile to run automatically. A new task schedule window popped up. Set the intervals in the “Schedule” tab and click “OK”. The task scheduler may ask for the password. Please note that you should input the password to your Windows user, not the password you set in Synology and not the 4-digit pin code that logs you in to your Windows PC.
Windows Task Scheduler
It seems the “Modify Schedule” configuration may fail to trigger the automatic backup. If that happened to you, the Windows Task Scheduler allows you to automate your backup. A task can be created with the following steps.
- First, open “Start” menu, and search for “Task Scheduler” by typing in its name and open the application by clicking the top result or pressing enter button.
- Second, right-click on the “Task Scheduler Library” branch and select the “New Folder” option to create a new folder for your tasks to keep them separate from system tasks.
- Third, select your task folder and right-click in the middle-upper pane (or click the “Action” menu), and then “Create Basic Task”.
- Fourth, type a short descriptive name for your task and click “Next”.
- Fifth, configure the triggers. You can set many triggers to run the task, for example, on a specific date, when a particular user logs in, or when connecting to a certain network. Then click “Next” to specify an action.
- Sixth, select the “Start a program” option and click “Next”. In the “Program/script” field, type in the full path to your DeltaCopy profile. There is a “.dcp” in your DeltaCopy folder with the name of your profile. For example, type in something like
D:\program\DeltaCopy\justatest.dcp. Then, click “Next” and “Finish” buttons. Task Scheduler will save your task and run automatically according to your trigger configuration.